
If you want to disassemble the unit further, like removing the circuit board from the upper section, you have a considerably tougher job on your hands, and you're on your own. Also, if you separate the screen from it's circuit board, you will disturb the rubber conductors (there are two) which provide electrical connection to the lcd rows and columns (zebra strips). Upon reassembly of the screen, you may find that you have lost some rows or columns in the display (not permanent, just a zebra strip alignment problem) and will have to keep reassembling and perhaps cleaning until it comes out okay. I haven't done this to my hp (yet) but I have done it to other cheap calculators and it wasn't fun.
The same picture, but in a better resolution (356k)
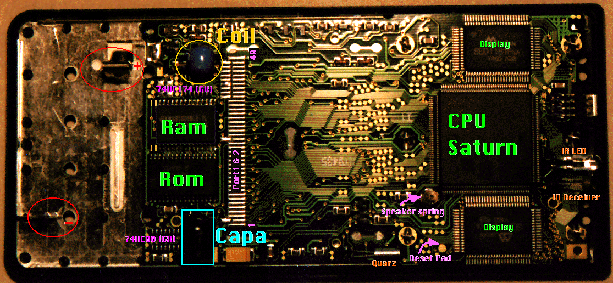
The ram chip is the original 32k ram. You can see on the left
the four pads waiting for the new 128k ram chip! The PCB of the
48G is the same as the 48GX! It differs only in the fact that
in the G ther's missing some chips. Especially the 74HC00 (bottom
of the picture) used to manage the port 1, and the 74HC174 used
for the bank switching mechanism used at port 2.
The Coil is used to generate regulated 5V (for the chips) and +/- 12V (for serial IO) from the 4.5 V delivered by the 3 batteries.The black capacitor maintain the ram while you are removing the batteries. You will also find there a good +5V source.
Port 1 is on the right, port 2 on the left (for the pins that are not the same for the two ports).
The CPU's name is Saturn. A nice processor with 64 bits internal registers, but with a data bus of 4 bits!!!
Full size and resolution picture of the HP48G pcb (printed circuit
board)![]() (344k)
(344k)