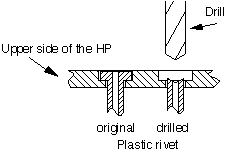

Believe it or not, these rivets aren't all that critical to holding
the unit together, so you can be as careful or as reckless as
you want (I prefer reckless, because I hate plastic rivets). A
good way to carefully remove the rivet heads is to use a flat
head screwdriver that is the same width as the recessed rivet
hole (4mm?) and "drill" the head away by hand with the screwdriver.
(I used a real drill to do this operation - SG).
 |
|
 |
The head is about 2mm deep, so stop "drilling" there to leave
the keyboard material shoulder intact for easier reconnection
later. There are 6 rivets near the number keys and four above
the screen. These rivets above the screen perform more of a holding
function than the others, and you may want to consider using some
screws and small washers to replace them when you re-assemble.
 This is a close-up of a drilled rivet.
